So I don't really know much about shooting wild life. A good place to start is at your local zoo, however, most of the animals are artificially tame and sedate so it's easy to get the shot you are after with a bit of zoom and some patience.
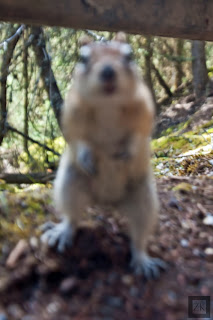
But what happens if you are on location? Well this shot shows what you don't want to happen...
You can imagine how upset I was when I got home to find this out-of-focus useless shot on the card. To get the wee ground squirrel standing on it's hind legs so close to the camera and not get the shot was frankly gutting. What went wrong? Well in this case it was simple - I had left the focus on manual for a previous shot and so it didn't focus on the animal but just some arbitrary point in the distance. Horrible.
None the less, it is quite a funny shot but would have been one of those "once in a life time" shots if I'd only remembered a few basics about shooting animals.
Recently a few friends of mine have posted some shots of animals on facebook and this reminded me that I wanted to go through some pointers for what to do when shooting this genre. As I hope I have already have demonstrated fully, I don't always remember what to do so this is also an aide memoir for me. But hey, that's one of the main reasons for this blog!
So here's the list...
I shoot in aperture mode and that allows all of the following tweaks...
Use a large aperture - this allows a fast shutter speed. However, don't have it too wide as this will cause aberrations and also you will lose some sharpness. Instead, stop down the lens a bit - so if you are shooting with an f1.8 lens then stop down to f2.5 or if you are shooting with an f2.8 lens (common in long lenses) stop down to f4.
Increase your ISO. Get it up to 1600 and if you are shooting in full frame go to 3200 if you have to. This will create noise but Lightroom 4 is incredible at removing this so I don't tend to bother about noise anymore. In fairness I shoot with a Nikon D700 and it's noise performance is incredible so I've got quite a bit of wiggle room. The reason for increasing the ISO is that is increases your sensor sensitivity and therefore increases your shutter speed. The result being that you have a better chance of "freezing" the image instead of having movement blur. This is a real problem with wildlife shots - those bugger move!!!
Under expose slightly. This will again increase your shutter speed a bit. I tend to shoot at -0.7EV which allows protection of the highlights in the shot also. Sometimes the bright parts of a shot will be overly white and when you try and recover the highlights there is nothing to recover. Under exposing slightly gives you a chance of getting back detail in those bright areas of the shot.
CONTINUOUS FOCUS. This is perhaps the most important thing. You can fix most things in post processing, however, one thing that you have no possibility of fixing if focus. So if you focus is off (like in the above photo) then you might as well ditch the shot. In Nikon cameras this is called "continuous focus" but in Canon it's referred to as "Servo Mode". This means that the camera continues to focus on the object in the middle of the view finder. Therefore, if the animal move towards or away from you then the camera will adjust the focus automatically. This really increases your change of getting the creature in focus.
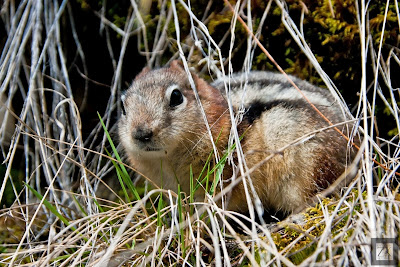
Anyway, I hope that you can see my point with this entry to the blog because if I'd paid attention to these "rules" then perhaps I would have got a shot like this...
 But what happens if you are on location? Well this shot shows what you don't want to happen...

No comments:
Post a Comment